If you are running on Amazon EC2 Container Service (ECS) you are familiar with the concept of “ECS-optimized AMI update”. This is a notification Amazon sends you when there is a new Docker Engine version that addresses a certain vulnerability. This means it’s time to update Amazon ECS-optimized AMI. And effectively switch to the new version of Docker Engine and ECS Agent.
What I’d like to show here is a safe method of updating ECS AMI. This method is a proven Blue/Green Deployment strategy that keeps your old AMI Instances on standby just in case the new AMI Instances fail under load. It gives you the time to burn-in the new Docker/ACS-Agent/AMI stack under real production load. And when you feel solid – you simply terminate the old instances.
But before we look at the solution lets examine what is the problem.
The Problem – NO Blue/Green!
As of today (Jan-19-2017), if you simply swap the ECS Instances from underneath your ECS Cluster they go away for good. There is no way to safely re-attach them back to the ECS Cluster. Here’s an Issue I opened on this on GitHub. Let me provide the summary here:
- I feel we should have a way to mark ECS Instances as StandBy and have the ECS Agent not schedule any tasks on them for as long as that status is active. I don’t think “Deregister” functionality is sufficient here because there is no way that I know of to bring deregistered instances back into service.
- I also don’t like that a specific version of Docker/ECS Agent is not pinned to a specific version of Amazon ECS-optimized AMI. If it were – this would not be an issue, we could always bring back a known, good working set of versions into service. But as it is now – even if we used an older AMI – it will pull in the most recent version of ECS Agent and Docker on instance launch.
However, the good news is that until above two points are addressed we have another solution – read below.
UPDATE@20170124:
Just 1 week after I reported this issue on github – AWS team implemented a solution called “Container Instance Draining”. I’m impressed! Way to go AWS ECS Team! see: GitHub issue update. Now you have two solutions – the one below and the new Container Instance Draining.
Solution – Task Placement Constraints
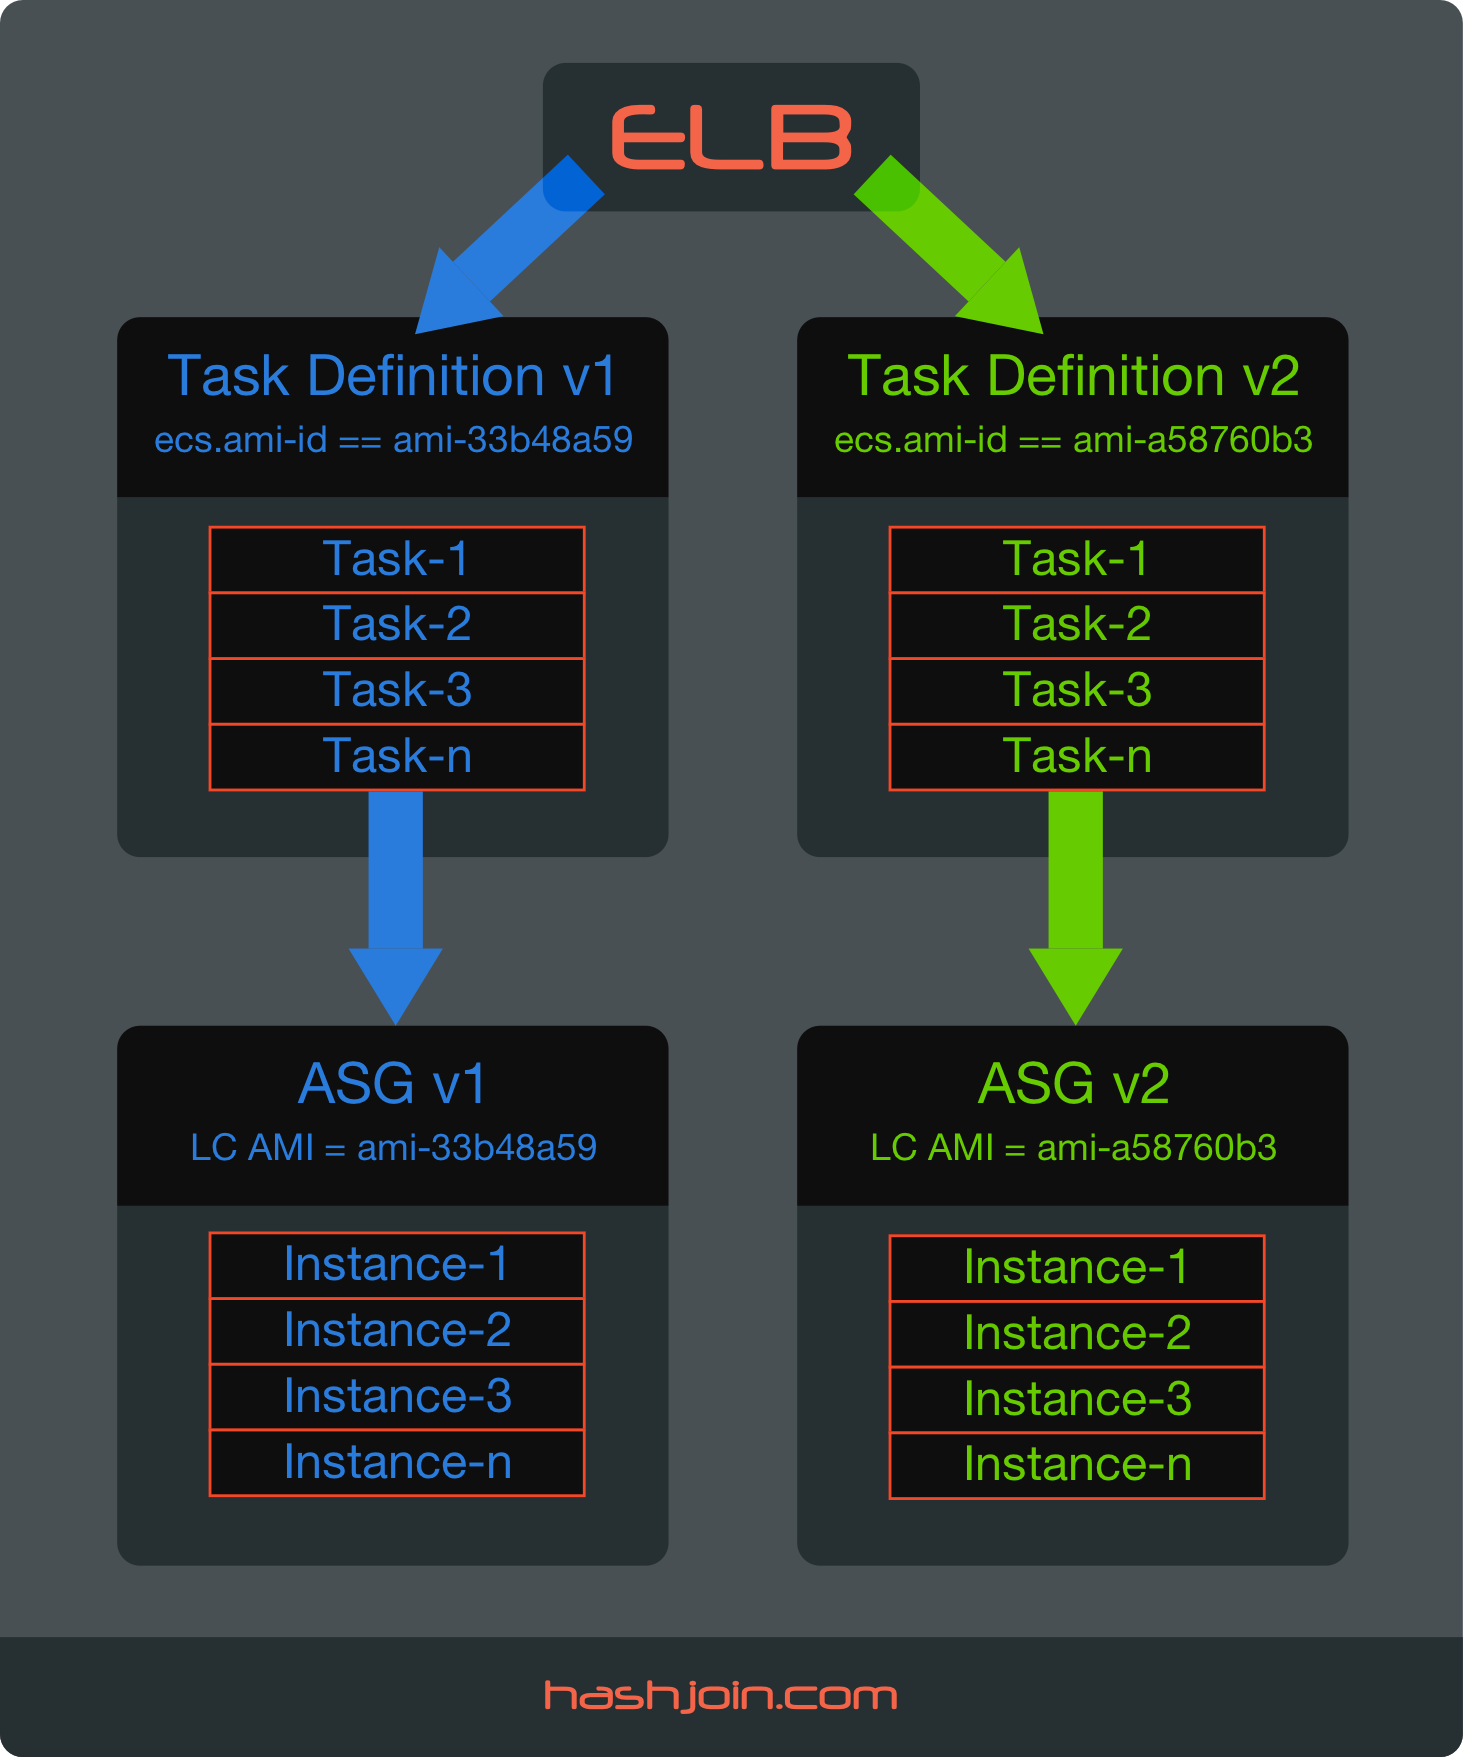
Solution is to utilize Task Placement Constraints in combination with ECS Instance Platform Attribute ecs.ami-id. This combination forces ECS Agent to place Running Tasks on the instances with specific AMI that we designate for a Task. Here’s how it works:
Lets say you are updating from amzn-ami-2015.09.g-amazon-ecs-optimized (ami-33b48a59) to amzn-ami-2016.09.d-amazon-ecs-optimized (ami-a58760b3). And lets say you register 4 NEW AMI Instances and 4 OLD AMI Instances to your ECS Cluster concurrently. Now, Task Placement Constraint can filter these 8 instances by AMI attribute directly. You can test how this works via aws ecs list-container-instances API call using --filter flag:
## List 4 OLD AMI Instances
ubuntu@a01:~$ aws ecs list-container-instances --cluster "my-cluster" --filter "attribute:ecs.ami-id == ami-33b48a59"

{
    "containerInstanceArns": [
        "arn:aws:ecs:us-east-1:111111111111:container-instance/0a963cf4-d629-4e6a-bf5d-2ea556cffa53",
        "arn:aws:ecs:us-east-1:111111111111:container-instance/4fb4398c-1339-4025-b260-64bc041b0d24",
        "arn:aws:ecs:us-east-1:111111111111:container-instance/9408ccd5-f6eb-4356-9786-d7b880e222e4",
        "arn:aws:ecs:us-east-1:111111111111:container-instance/ead2d264-96cf-46f2-bb28-e4965385ebec"
    ]
}
Armed with knowledge we can create two Task Definitions with placementConstraints = specific AMI and then assign the desired task definition to the ECS Service. Then, automagically, ECS Agent does all the heavy lifting by effectively moving Running Tasks from one set of AMI Instances to another, draining connections and updating ELB. The best part is that we can go back and forth – effectively employing Blue/Green Deployment strategy.
The Runbook (AWS Console)
Here’s a step by step process using AWS Console. Once you know how to do this manually – it’s possible to automate it.
For this example, lets pretend we have the following stack:
- We have an ECS Cluster with a Service and a Task that already runs under this Service.
- There is an Auto Scaling Group with 4 ECS Instances serving this ECS Cluster
- Each Task is placed on a single instance, this is achieved via a static Host Port / Container Port mapping (80->8080)
- The Service is defined with a Minimum healthy percent = 50 and a Maximum percent = 100
- These current ECS instances are running an “OLD AMI” ami-33b48a59
- The goal is to safely upgrade this ECS Cluster and switch it to “NEW AMI” ami-a58760b3
Lets get on with it:
1. Create New Task Definition (OLD AMI)
Go to: AWS Console -> Amazon ECS -> Task Definitions
- Click on the Task Definition
- Click [x] Next to the latest Task Definition Revision
- Click Create Revision
- Click (+) next to “Add constraint”
- Fill in the following:
Type: memberOf (already pre-filled/can’t change this)
Expression: attribute:ecs.ami-id == ami-33b48a59 - Click Create
Resulting JSON (relevant section):
  "placementConstraints": [
    {
      "expression": "attribute:ecs.ami-id == ami-33b48a59",
      "type": "memberOf"
    }
  ],
2. Update ECS Service with new Task Definition Revision (OLD AMI ID)
Go to: AWS Console -> Amazon ECS -> Clusters
- Click on Cluster Name
- Under Services Tab – Click On Service Name
- This Brings up Service Detail page – Click Update Button
- Under Task Definition column pull down the drop list and pick the Task Definition we created in step 1
- Click Update Service
NOTE:
At this point ECS Agent will start draining connection to old Tasks and start placing new Revision of tasks onto the same instances (it drops 4 tasks to 2 and then swaps them one at a time): 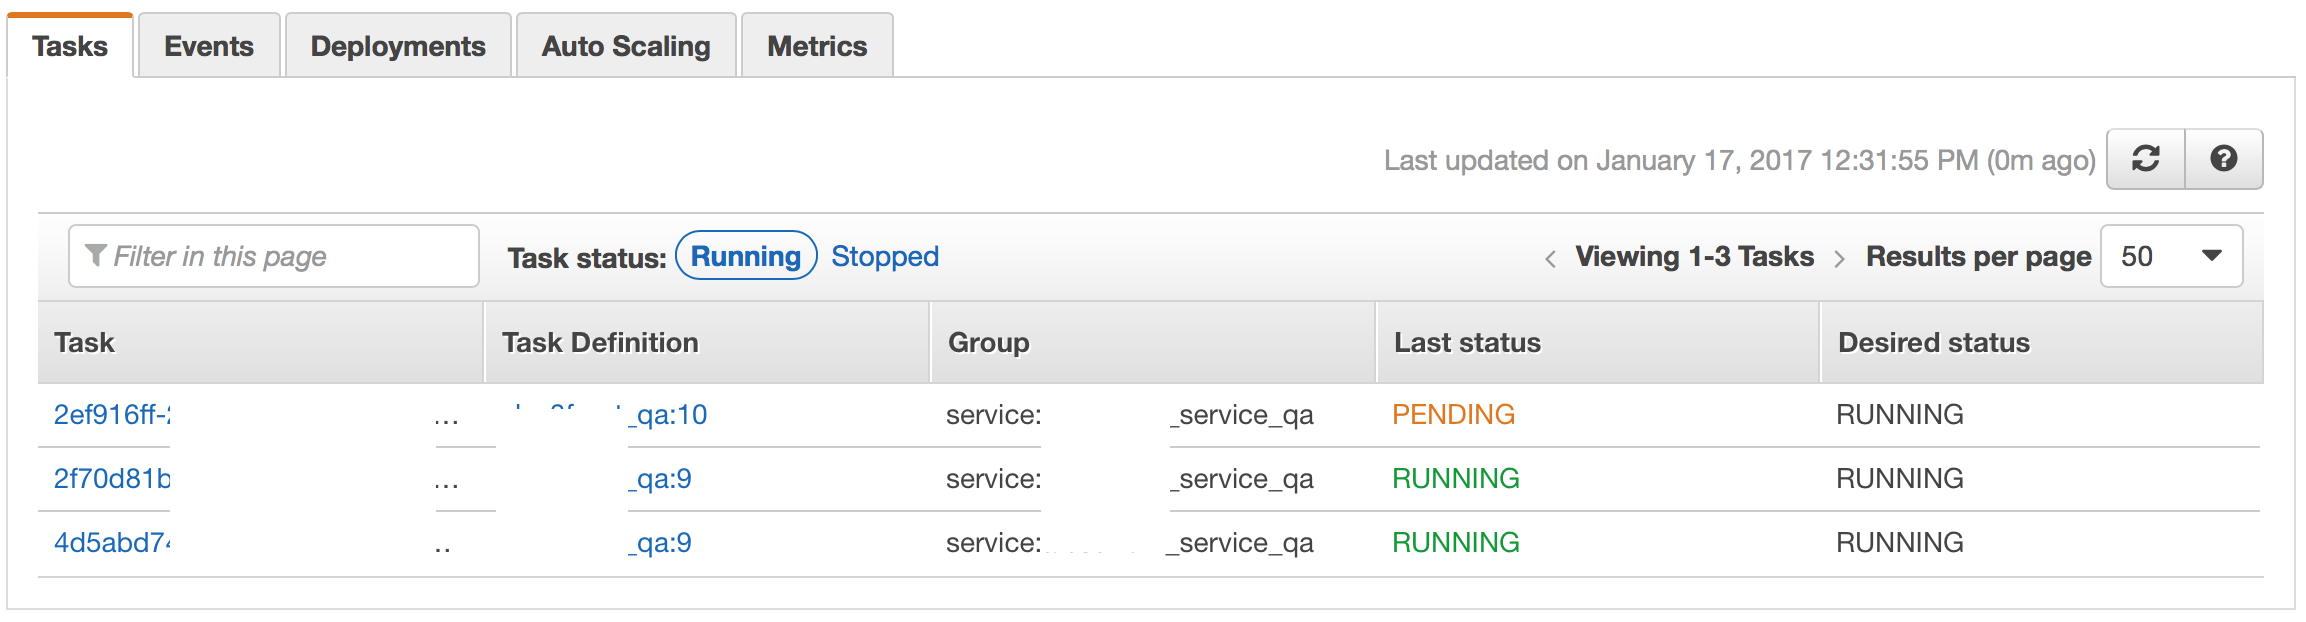
End result: all tasks are running at latest revision, still on the OLD AMI ID.
3. Launch 4 Additional EC2 Instances (NEW AMI)
Go to: AWS Console -> Amazon EC2 -> Launch Configuration
- Select [x] Next to your launch configuration
- In the detail pane Click Copy launch configuration button
- Edit AMI – change from amzn-ami-2015.09.g-amazon-ecs-optimized – ami-33b48a59 to amzn-ami-2016.09.d-amazon-ecs-optimized – ami-a58760b3
- Click Yes to confirm AMI change and warnings about possible changes to instance type selection, Spot Instance configuration, storage configuration, and security group configuration
- Leave selection on existing instance size/type
- Change name to something new (we append a number to basename)
- Leave everything else as is
- Click Next (Storage) – leave as is
- Click Next (Security Groups) – leave as is
- Click Review
- Click Create launch configuration
- Confirm you have Key Pair
- Create New launch configuration
Go to: AWS Console -> Amazon EC2 -> Auto Scaling Groups
- Select [x] next to your Auto Scaling Group (ASG)
- Pull Down “Actions”
- Select Edit
- Change Desired: 8 (from 4); Change Max: 8 (from 4); Change Launch Configuration to the name you created in previous step
- Click Save
Wait Until 4 new Instances are added and their status is InService.
At this point you have 8 instances – 4 with OLD AMI and 4 with NEW AMI. The reason this works is because ASG doesn’t do anything with existing running instances when you change it’s Launch Configuration (LC). It just lets them run as-is unless you downsize ASG – at which point it’ll scale-in (terminate) the instances with old LC, which is exactly what we’ll use in the last step.
Alternative method is to create a whole new ASG with new LC – this is the way I would do this from now on – it’s a safer process. However changing LC works as well and that’s what I did here.
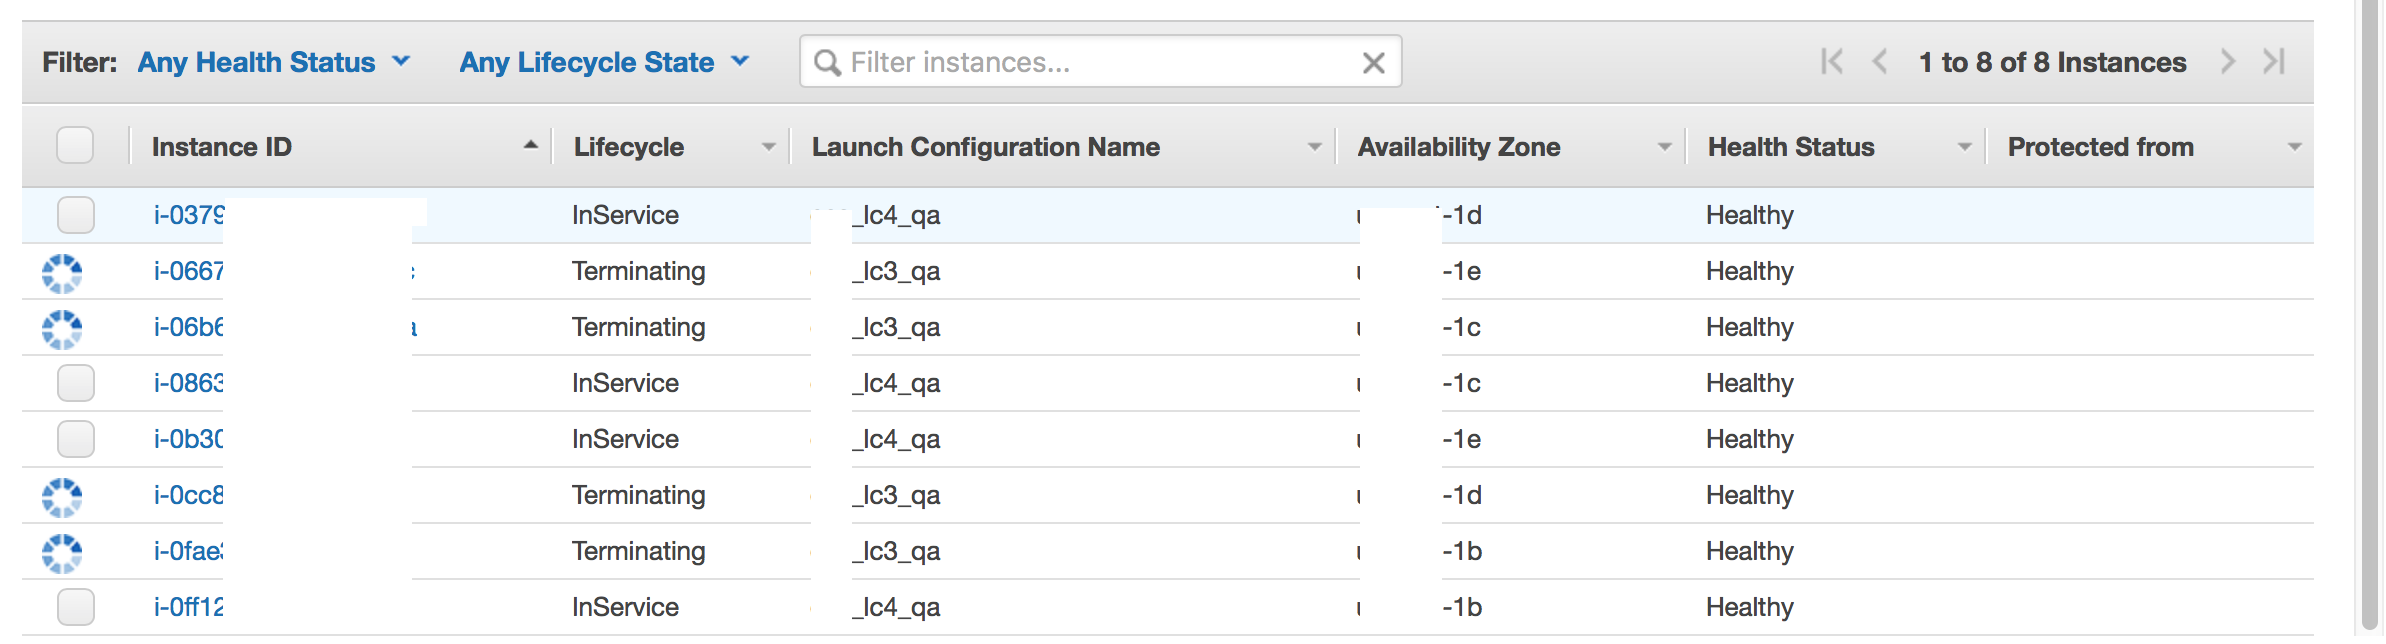
Regardless of the method you use to add 4 new instances — they should register under ECS Cluster. Lets verify this — go back to the ESC Cluster page and click on the Instances Tab – it should show 8 instances registered with 4 OLD AMI Instances and 4 NEW AMI Instances. And all tasks are still running on the 4 OLD AMI Instances:

And now our next step is to migrate the Running Tasks to the 4 NEW AMI Instances.
4. Create New Task Definition (NEW AMI)
Go to: AWS Console -> Amazon ECS -> Task Definitions
- Click on the Task Definition
- Click [x] Next to the latest Task Definition Revision
- Click Create Revision
- Under “Constraint” Update memberOf to new AMI ID (ami-a58760b3)
- Click Create
Resulting JSON (relevant section):
  "placementConstraints": [
    {
      "expression": "attribute:ecs.ami-id == ami-a58760b3",
      "type": "memberOf"
    }
  ],
5. Update ECS Service with new Task Definition Revision (NEW AMI ID)
Go to: AWS Console -> Amazon ECS -> Clusters
- Click on Cluster Name
- Under Services Tab – Click On Service Name
- This Brings up Service Detail page – Click Update Button
- Under Task Definition column pull down the drop list and pick the Task Definition we created in step 4
- Click Update Service
End result:
- All tasks are running at latest revision and are placed on the NEW AMI Instances
- 4 OLD AMI Instances are still in service and we can switch to them by updating the ECS Service with the old Task Definition which is bound to use OLD AMI Instances via it’s Constraint

6. Finally Switch Back The Auto Scaling Group to 4 Instances
Once we feel solid the new AMI/Docker/ECS-Agent stack performs under production load – we can terminate the old instances by setting ASG’s Max and Desired back to 4. This automatically Terminates the Instances with OLD Launch Configuration and leaves the instances with new Launch Configuration active:
Conclusion
So far I am very happy with Amazon EC2 Container Service. It served us well for almost a year now. And during our first major upgrade we found a Zero-Downtime solution utilizing a classic, well proven Blue/Green Deployment strategy.